The data block API
The data block API lets you customize the creation of a DataBunch by isolating the underlying parts of that process in separate blocks, mainly:
- Where are the inputs and how to create them?
- How to split the data into a training and validation sets?
- How to label the inputs?
- What transforms to apply?
- How to add a test set?
- How to wrap in dataloaders and create the
DataBunch?
Each of these may be addressed with a specific block designed for your unique setup. Your inputs might be in a folder, a csv file, or a dataframe. You may want to split them randomly, by certain indices or depending on the folder they are in. You can have your labels in your csv file or your dataframe, but it may come from folders or a specific function of the input. You may choose to add data augmentation or not. A test set is optional too. Finally you have to set the arguments to put the data together in a DataBunch (batch size, collate function...)
The data block API is called as such because you can mix and match each one of those blocks with the others, allowing for a total flexibility to create your customized DataBunch for training, validation and testing. The factory methods of the various DataBunch are great for beginners but you can't always make your data fit in the tracks they require.

As usual, we'll begin with end-to-end examples, then switch to the details of each of those parts.
Examples of use
Let's begin with our traditional MNIST example.
from fastai.vision import *
path = untar_data(URLs.MNIST_TINY)
tfms = get_transforms(do_flip=False)
path.ls()
(path/'train').ls()
In vision.data, we can create a DataBunch suitable for image classification by simply typing:
data = ImageDataBunch.from_folder(path, ds_tfms=tfms, size=64)
This is a shortcut method which is aimed at data that is in folders following an ImageNet style, with the train and valid directories, each containing one subdirectory per class, where all the labelled pictures are. There is also a test directory containing unlabelled pictures.
Here is the same code, but this time using the data block API, which can work with any style of a dataset. All the stages, which will be explained below, can be grouped together like this:
data = (ImageList.from_folder(path) #Where to find the data? -> in path and its subfolders
        .split_by_folder()              #How to split in train/valid? -> use the folders
        .label_from_folder()            #How to label? -> depending on the folder of the filenames
        .add_test_folder()              #Optionally add a test set (here default name is test)
        .transform(tfms, size=64)       #Data augmentation? -> use tfms with a size of 64
        .databunch())                   #Finally? -> use the defaults for conversion to ImageDataBunch
Now we can look at the created DataBunch:
data.show_batch(3, figsize=(6,6), hide_axis=False)

Let's look at another example from vision.data with the planet dataset. This time, it's a multiclassification problem with the labels in a csv file and no given split between valid and train data, so we use a random split. The factory method is:
planet = untar_data(URLs.PLANET_TINY)
planet_tfms = get_transforms(flip_vert=True, max_lighting=0.1, max_zoom=1.05, max_warp=0.)
pd.read_csv(planet/"labels.csv").head()
data = ImageDataBunch.from_csv(planet, folder='train', size=128, suffix='.jpg', label_delim = ' ', ds_tfms=planet_tfms)
With the data block API we can rewrite this like that:
planet.ls()
pd.read_csv(planet/"labels.csv").head()
data = (ImageList.from_csv(planet, 'labels.csv', folder='train', suffix='.jpg')
        #Where to find the data? -> in planet 'train' folder
        .split_by_rand_pct()
        #How to split in train/valid? -> randomly with the default 20% in valid
        .label_from_df(label_delim=' ')
        #How to label? -> use the second column of the csv file and split the tags by ' '
        .transform(planet_tfms, size=128)
        #Data augmentation? -> use tfms with a size of 128
        .databunch())
        #Finally -> use the defaults for conversion to databunch
data.show_batch(rows=2, figsize=(9,7))

The data block API also allows you to get your data together in problems for which there is no direct ImageDataBunch factory method. For a segmentation task, for instance, we can use it to quickly get a DataBunch. Let's take the example of the camvid dataset. The images are in an 'images' folder and their corresponding mask is in a 'labels' folder.
camvid = untar_data(URLs.CAMVID_TINY)
path_lbl = camvid/'labels'
path_img = camvid/'images'
We have a file that gives us the names of the classes (what each code inside the masks corresponds to: a pedestrian, a tree, a road...)
codes = np.loadtxt(camvid/'codes.txt', dtype=str); codes
And we define the following function that infers the mask filename from the image filename.
get_y_fn = lambda x: path_lbl/f'{x.stem}_P{x.suffix}'
Then we can easily define a DataBunch using the data block API. Here we need to use tfm_y=True in the transform call because we need the same transforms to be applied to the target mask as were applied to the image. Side note: For further control over which transformations are used on the target, each transformation has a use_on_y parameter
data = (SegmentationItemList.from_folder(path_img)
        #Where to find the data? -> in path_img and its subfolders
        .split_by_rand_pct()
        #How to split in train/valid? -> randomly with the default 20% in valid
        .label_from_func(get_y_fn, classes=codes)
        #How to label? -> use the label function on the file name of the data
        .transform(get_transforms(), tfm_y=True, size=128)
        #Data augmentation? -> use tfms with a size of 128, also transform the label images
        .databunch())
        #Finally -> use the defaults for conversion to databunch
data.show_batch(rows=2, figsize=(7,5))

Another example for object detection. We use our tiny sample of the COCO dataset here. There is a helper function in the library that reads the annotation file and returns the list of images names with the list of labelled bboxes associated to it. We convert it to a dictionary that maps image names with their bboxes and then write the function that will give us the target for each image filename.
coco = untar_data(URLs.COCO_TINY)
images, lbl_bbox = get_annotations(coco/'train.json')
img2bbox = dict(zip(images, lbl_bbox))
get_y_func = lambda o:img2bbox[o.name]
The following code is very similar to what we saw before. The only new addition is the use of a special function to collate the samples in batches. This comes from the fact that our images may have multiple bounding boxes, so we need to pad them to the largest number of bounding boxes.
data = (ObjectItemList.from_folder(coco)
        #Where are the images? -> in coco and its subfolders
        .split_by_rand_pct()
        #How to split in train/valid? -> randomly with the default 20% in valid
        .label_from_func(get_y_func)
        #How to find the labels? -> use get_y_func on the file name of the data
        .transform(get_transforms(), tfm_y=True)
        #Data augmentation? -> Standard transforms; also transform the label images
        .databunch(bs=16, collate_fn=bb_pad_collate))
        #Finally we convert to a DataBunch, use a batch size of 16,
        # and we use bb_pad_collate to collate the data into a mini-batch
data.show_batch(rows=2, ds_type=DatasetType.Valid, figsize=(6,6))

But vision isn't the only application where the data block API works. It can also be used for text and tabular data. With our sample of the IMDB dataset (labelled texts in a csv file), here is how to get the data together for a language model.
from fastai.text import *
imdb = untar_data(URLs.IMDB_SAMPLE)
data_lm = (TextList
           .from_csv(imdb, 'texts.csv', cols='text')
           #Where are the text? Column 'text' of texts.csv
           .split_by_rand_pct()
           #How to split it? Randomly with the default 20% in valid
           .label_for_lm()
           #Label it for a language model
           .databunch())
           #Finally we convert to a DataBunch
data_lm.show_batch()
For a classification problem, we just have to change the way labeling is done. Here we use the csv column label.
data_clas = (TextList.from_csv(imdb, 'texts.csv', cols='text')
                   .split_from_df(col='is_valid')
                   .label_from_df(cols='label')
                   .databunch())
data_clas.show_batch()
Lastly, for tabular data, we just have to pass the name of our categorical and continuous variables as an extra argument. We also add some PreProcessors that are going to be applied to our data once the splitting and labelling is done.
from fastai.tabular import *
adult = untar_data(URLs.ADULT_SAMPLE)
df = pd.read_csv(adult/'adult.csv')
dep_var = 'salary'
cat_names = ['workclass', 'education', 'marital-status', 'occupation', 'relationship', 'race', 'sex', 'native-country']
cont_names = ['education-num', 'hours-per-week', 'age', 'capital-loss', 'fnlwgt', 'capital-gain']
procs = [FillMissing, Categorify, Normalize]
data = (TabularList.from_df(df, path=adult, cat_names=cat_names, cont_names=cont_names, procs=procs)
                           .split_by_idx(valid_idx=range(800,1000))
                           .label_from_df(cols=dep_var)
                           .databunch())
data.show_batch()
Step 1: Provide inputs
The basic class to get your inputs is the following one. It's also the same class that will contain all of your labels (hence the name ItemList).
This class regroups the inputs for our model in items and saves a path attribute which is where it will look for any files (image files, csv file with labels...). label_cls will be called to create the labels from the result of the label function, inner_df is an underlying dataframe, and processor is to be applied to the inputs after the splitting and labeling.
It has multiple subclasses depending on the type of data you're handling. Here is a quick list:
CategoryListfor labels in classificationMultiCategoryListfor labels in a multi classification problemFloatListfor float labels in a regression problemImageListfor data that are imagesSegmentationItemListlikeImageListbut will default labels toSegmentationLabelListSegmentationLabelListfor segmentation masksObjectItemListlikeImageListbut will default labels toObjectLabelListObjectLabelListfor object detectionPointsItemListfor points (of the typeImagePoints)ImageImageListfor image to image tasksTextListfor text dataTextListfor text data stored in filesTabularListfor tabular dataCollabListfor collaborative filtering
We can get a little glimpse of how ItemList's basic attributes and methods behave with the following code examples.
from fastai.vision import *
path_data = untar_data(URLs.MNIST_TINY)
il_data = ItemList.from_folder(path_data, extensions=['.csv'])
il_data
Here is how to access the path of ItemList and the actual items (here files) in the path.
il_data.path
il_data.items
len(il_data) gives you the count of files inside il_data and you can access individual items using index.
len(il_data)
il_data[1]
il_data[:1]
With il_data.add we can perform in_place concatenate another ItemList object.
il_data.add(il_data); il_data
from fastai.vision import *
path_data = untar_data(URLs.MNIST_TINY); path_data.ls()
itemlist = ItemList.from_folder(path_data/'test')
itemlist
As we can see, the files do not necesarily return in alpha-numeric order by default. In the above: 1503.png, ... 617.png, 585.png ...
This is OK when you're always using the same machine, as the same dataset should return in the same order. But when building a datablock on one machine (say GCP) and then porting the same code to a different machine (say your laptop) that same dataset and code might return the files in a different order.
Since all random operations use the loaded order of the dataset as the starting point, you will not be able to replicate any random operations, say randomly splitting the data into 80% train, and 20% validation, even while correctly seeding.
The solution is to use presort=True in the .from_folder() method. As can be seen below, with that argument turned on, the file is returned in ascending order, and this behavior will match across machines and across platforms. Now you can reproduce any random operation you perform on the loaded data.
itemlist = ItemList.from_folder(path_data/'test', presort=True)
itemlist
How is the output above generated?
behind the scenes, executing itemlist calls ItemList.__repr__ which basically prints out itemlist[0] to itemlist[4]
itemlist[0]
and itemlist[0] basically calls itemlist.get(0) which returns itemlist.items[0]. That's why we have outputs like above.
Once you have selected the class that is suitable, you can instantiate it with one of the following factory methods
path = untar_data(URLs.MNIST_TINY)
path.ls()
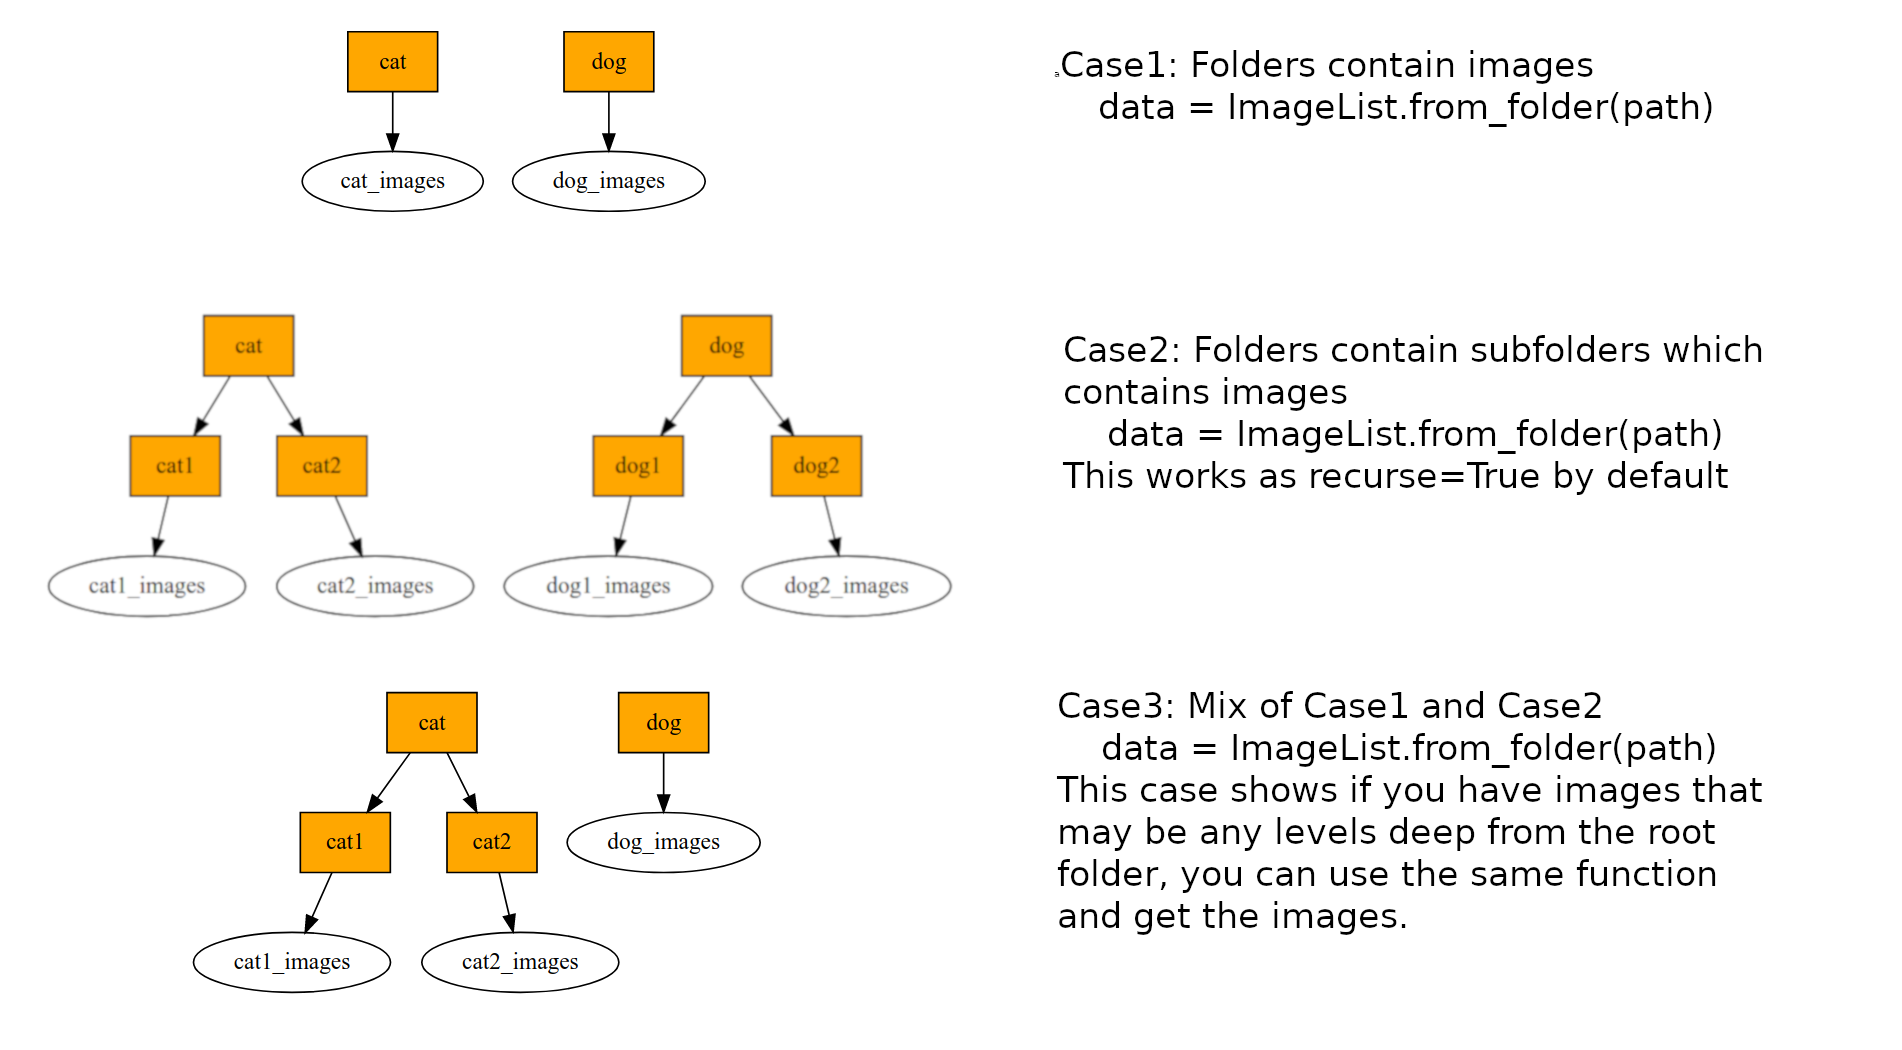
ImageList.from_folder(path)
path is your root data folder. In the path directory you have train and valid folders which would contain your images. For the below example, train folder contains two folders/classes cat and dog.
Dataframe has 2 columns. The first column is the path to the image and the second column contains label id for that image. In case you have multi-labels (i.e more than one label for a single image), you will have a space (as determined by label_delim argument of label_from_df) seperated string in the labels column.
from_df and from_csv can be used in a more general way. In cases you are not able to figure out how to get your ImageList, it is very easy to make a csv file with the above format.
How to set path? path refers to your root data directory. So the paths in your csv file should be relative to path and not absolute paths. In the below example, in labels.csv the paths to the images are path + train/3/7463.png
path = untar_data(URLs.MNIST_SAMPLE)
path.ls()
df = pd.read_csv(path/'labels.csv')
df.head()
ImageList.from_df(df, path)
path = untar_data(URLs.MNIST_SAMPLE)
path.ls()
ImageList.from_csv(path, 'labels.csv')
Optional step: filter your data
The factory method may have grabbed too many items. For instance, if you were searching sub folders with the from_folder method, you may have gotten files you don't want. To remove those, you can use one of the following methods.
path = untar_data(URLs.MNIST_SAMPLE)
df = pd.read_csv(path/'labels.csv')
df.head()
Suppose that you only want to keep images with a suffix ".png". Well, this method will do magic for you.
Path(df.name[0]).suffix
ImageList.from_df(df, path).filter_by_func(lambda fname: Path(fname).suffix == '.png')
path = untar_data(URLs.MNIST_SAMPLE)
ImageList.from_folder(path).filter_by_rand(0.5)
Contrast the number of items with the list created without the filter.
ImageList.from_folder(path)
path = untar_data(URLs.MNIST_SAMPLE)
pd.read_csv(path/'labels.csv').head()
file_name = "item_list.txt"
ImageList.from_folder(path).to_text(file_name)
! cat {path/file_name} | head
path = untar_data(URLs.MNIST_SAMPLE)
ImageList.from_folder(path).use_partial_data(0.5)
Contrast the number of items with the list created without the filter.
ImageList.from_folder(path)
First check if you can't easily customize one of the existing subclass by:
- subclassing an existing one and replacing the
getmethod (or theopenmethod if you're dealing with images) - applying a custom
processor(see step 4) - changing the default
label_clsfor the label creation - adding a default
PreProcessorwith the_processorclass variable
If this isn't the case and you really need to write your own class, there is a full tutorial that explains how to proceed.
We will have a glimpse of how get work with the following demo.
path_data = untar_data(URLs.MNIST_TINY); path_data.ls()
il_data_base = ItemList.from_folder(path=path_data, extensions=['.png'], include=['test'])
il_data_base
get is used inexplicitly within il_data_base[15]. il_data_base.get(15) gives the same result here, because its defulat it's to return that.
il_data_base[15]
While creating your custom ItemList however, you can override this function to do some things to your item (like opening an image).
il_data_image = ImageList.from_folder(path=path_data, extensions=['.png'], include=['test'])
il_data_image
Again, normally get is used inexplicitly within il_data_image[15].
il_data_image[15]

The reason why an image is printed out instead of a FilePath object, is ImageList.get overwrites ItemList.get and use ImageList.open to print an image.
You'll never need to subclass this normally, just don't forget to add to self.copy_new the names of the arguments that needs to be copied each time new is called in __init__.
We will get a feel of how new works with the following examples.
path_data = untar_data(URLs.MNIST_TINY); path_data.ls()
itemlist1 = ItemList.from_folder(path=path_data/'valid', extensions=['.png'])
itemlist1
As you will see below, copy_new allows us to borrow any argument and its value from itemlist1, and itemlist1.new(itemlist1.items) allows us to use items and arguments inside copy_new to create another ItemList by calling ItemList.__init__.
itemlist1.copy_new == ['x', 'label_cls', 'path']
((itemlist1.x == itemlist1.label_cls == itemlist1.inner_df == None)
 and (itemlist1.path == Path('/Users/Natsume/.fastai/data/mnist_tiny/valid')))
You can select any argument from ItemList.__init__'s signature and change their values.
itemlist1.copy_new = ['x', 'label_cls', 'path', 'inner_df']
itemlist1.x = itemlist1.label_cls = itemlist1.path = itemlist1.inner_df = 'test'
itemlist2 = itemlist1.new(items=itemlist1.items)
(itemlist2.inner_df == itemlist2.x == itemlist2.label_cls == 'test'
and itemlist2.path == Path('test'))
Step 2: Split the data between the training and the validation set
This step is normally straightforward, you just have to pick one of the following functions depending on what you need.
This function is handy if you want to work with subsets of specific sizes, e.g., you want to use 20% of the data for the validation dataset, but you only want to train on a small subset of the rest of the data: split_subsets(train_size=0.08, valid_size=0.2).
Internally makes a call to split_by_files. fname contains your image file names like 0001.png.
Basically, split_by_folder takes in two folder names ('train' and 'valid' in the following example), to split il the large ImageList into two smaller ImageLists, one for training set and the other for validation set. Both ImageLists are attached to a large ItemLists which is the final output of split_by_folder.
path_data = untar_data(URLs.MNIST_TINY); path_data.ls()
il = ItemList.from_folder(path=path_data); il
sd = il.split_by_folder(train='train', valid='valid'); sd
train_idx = il._get_by_folder(name='train')
train_idx[:5], train_idx[-5:], len(train_idx)
valid_idx = il._get_by_folder(name='valid')
valid_idx[:5], valid_idx[-5:],len(valid_idx)
By the way, _get_by_folder(name) works in the following way, first, index the entire il.items, loop every item and if an item belongs to the named folder, e.g., 'train', then put it into a list. The folder name is the only input, and output is the list.
path = untar_data(URLs.MNIST_SAMPLE)
df = pd.read_csv(path/'labels.csv')
df.head()
You can pass a list of indices that you want to put in the validation set like [1, 3, 10]. Or you can pass a contiguous list like list(range(1000))
data = (ImageList.from_df(df, path)
                 .split_by_idx(list(range(1000))))
data
sd = il.split_by_idxs(train_idx=train_idx, valid_idx=valid_idx); sd
sd = il.split_by_list(train=il[train_idx], valid=il[valid_idx]); sd
This is more of an internal method, you should be using split_by_files if you want to pass a list of filenames for the validation set.
To use this function, you need a boolean column (default to the third column of the dataframe). The examples put in the validation set correspond to the indices with True value in that column.
path = untar_data(URLs.MNIST_SAMPLE)
df = pd.read_csv(path/'labels.csv')

# Create a new column for is_valid
df['is_valid'] = [True]*(df.shape[0]//2) + [False]*(df.shape[0]//2)

# Randomly shuffle dataframe
df = df.reindex(np.random.permutation(df.index))
print(df.shape)
df.head()
data = (ImageList.from_df(df, path)
                 .split_from_df())
data
Step 3: Label the inputs
To label your inputs, use one of the following functions. Note that even if it's not in the documented arguments, you can always pass a label_cls that will be used to create those labels (the default is the one from your input ItemList, and if there is none, it will go to CategoryList, MultiCategoryList or FloatList depending on the type of the labels). This is implemented in the following function:
Behind the scenes, ItemList.get_label_cls basically select a label class according to the item type of labels, whereas labels can be any of Collection, pandas.core.frame.DataFrame, pandas.core.series.Series. If the list elements are of type string or integer, get_label_cls will output CategoryList; if they are of type float, then it will output FloatList; if they are of type Collection, then it will output MultiCategoryList.
from fastai.vision import *
path_data = untar_data(URLs.MNIST_TINY)
sd = ImageList.from_folder(path_data).split_by_folder('train', 'valid'); sd
labels = ['7', '3']
label_cls = sd.train.get_label_cls(labels); label_cls
labels = [7, 3]
label_cls = sd.train.get_label_cls(labels); label_cls
labels = [7.0, 3.0]
label_cls = sd.train.get_label_cls(labels); label_cls
labels = [[7, 3],]
label_cls = sd.train.get_label_cls(labels); label_cls
labels = [['7', '3'],]
label_cls = sd.train.get_label_cls(labels); label_cls
If no label_cls argument is passed, the correct labeling type can usually be inferred based on the data (for classification or regression). If you have multiple regression targets (e.g. predict 5 different numbers from a single image/text), be aware that arrays of floats are by default considered to be targets for one-hot encoded classification. If your task is regression, be sure the pass label_cls = FloatList so that learners created from your databunch initialize correctly.
The first example in these docs created labels as follows:
path = untar_data(URLs.MNIST_TINY)
ll = ImageList.from_folder(path).split_by_folder().label_from_folder().train
If you want to save the data necessary to recreate your LabelList (not including saving the actual image/text/etc files), you can use to_df or to_csv:
ll.train.to_csv('tmp.csv')
Or just grab a pd.DataFrame directly:
ll.to_df().head()
Behind the scenes, when an ItemList calls label_from_folder, it creates a lambda function which outputs a foldername which a file Path object immediately or directly belongs to, and then calls label_from_func with the lambda function as input.
On the practical and high level, label_from_folder is mostly used with ItemLists rather than ItemList for simplicity and efficiency, for details see the label_from_folder example on ItemLists. Even when you just want a training set ItemList, you still need to do split_none to create an ItemLists and then do labeling with label_from_folder, as the example shown below.
from fastai.vision import *
path_data = untar_data(URLs.MNIST_TINY); path_data.ls()
sd_train = ImageList.from_folder(path_data/'train').split_none()
ll_train = sd_train.label_from_folder(); ll_train
Inside label_from_func, it applies the input func to every item of an ItemList and puts all the function outputs into a list, and then passes the list onto ItemList._label_from_list. Below is a simple example of using label_from_func.
from fastai.vision import *
path_data = untar_data(URLs.MNIST_TINY)
sd = ImageList.from_folder(path_data).split_by_folder('train', 'valid');sd
func=lambda o: (o.parts if isinstance(o, Path) else o.split(os.path.sep))[-2]
The lambda function above is to access the immediate foldername for a file Path object.
ll = sd.label_from_func(func); ll
ItemList suitable for storing labels in items belonging to classes. If None are passed, classes will be determined by the unique different labels. processor will default to CategoryProcessor.
CategoryList uses labels to create an ItemList for dealing with categorical labels. Behind the scenes, CategoryList is a subclass of CategoryListBase which is a subclass of ItemList. CategoryList inherits from CategoryListBase the properties such as classes (default as None), filter_missing_y (default as True), and has its own unique property loss_func (default as CrossEntropyFlat()), and its own class attribute _processor (default as CategoryProcessor).
from fastai.vision import *
path_data = untar_data(URLs.MNIST_TINY)
ll = ImageList.from_folder(path_data).split_by_folder('train', 'valid').label_from_folder()
ll.train.y.items, ll.train.y.classes, ll.train.y[0]
cl = CategoryList(ll.train.y.items, ll.train.y.classes); cl
For the behavior of printing out CategoryList object or access an element using index, please see CategoryList.get below.
Behind the scenes, CategoryList.get is used inexplicitly when printing out the CategoryList object or cl[idx]. According to the source of CategoryList.get, each item is used to get its own class. When 'classes' is a list of strings, then elements of items are used as index of a list, therefore they must be integers in the range from 0 to len(classes)-1; if classes is a dictionary, then elements of items are used as keys, therefore they can be strings too. See examples below for details.
from fastai.vision import *
items = np.array([0, 1, 2, 1, 0])
cl = CategoryList(items, classes=['3', '7', '9']); cl
items = np.array(['3', '7', '9', '7', '3'])
classes = {'3':3, '7':7, '9':9}
cl = CategoryList(items, classes); cl
It will store a list of labels in items belonging to classes. If None are passed, classes will be determined by the different unique labels. sep is used to split the content of items in a list of tags.
If one_hot=True, the items contain the labels one-hot encoded. In this case, it is mandatory to pass a list of classes (as we can't use the different labels).
Invisible step: preprocessing
This isn't seen here in the API, but if you passed a processor (or a list of them) in your initial ItemList during step 1, it will be applied here. If you didn't pass any processor, a list of them might still be created depending on what is in the _processor variable of your class of items (this can be a list of PreProcessor classes).
A processor is a transformation that is applied to all the inputs once at initialization, with a state computed on the training set that is then applied without modification on the validation set (and maybe the test set). For instance, it can be processing texts to tokenize then numericalize them. In that case we want the validation set to be numericalized with exactly the same vocabulary as the training set.
Another example is in tabular data, where we fill missing values with (for instance) the median computed on the training set. That statistic is stored in the inner state of the PreProcessor and applied on the validation set.
This is the generic class for all processors.
Process one item. This method needs to be written in any subclass.
ds: an object of ItemList
Process a dataset. This default to apply process_one on every item of ds.
ds is an object of CategoryList.
It basically generates a list of unique labels (assigned to ds.classes) and a dictionary mapping classes to indexes (assigned to ds.c2i).
It is an internal function only called to apply processors to training, validation and testing datasets after the labeling step.
Optional steps
Add transforms
Transforms differ from processors in the sense they are applied on the fly when we grab one item. They also may change each time we ask for the same item in the case of random transforms.
This is primary for the vision application. The kwargs arguments are the ones expected by the type of transforms you pass. tfm_y is among them and if set to True, the transforms will be applied to input and target.
For examples see: vision.transforms.
Add a test set
To add a test set, you can use one of the two following methods.
Instead, either the passed label argument or an empty label will be used for all entries of this dataset (this is required by the internal pipeline of fastai).
In the fastai framework test datasets have no labels - this is the unknown data to be predicted. If you want to validate your model on a test dataset with labels, you probably need to use it as a validation set, as in:
data_test = (ImageList.from_folder(path)
        .split_by_folder(train='train', valid='test')
        .label_from_folder()
        ...)
Another approach, where you do use a normal validation set, and then when the training is over, you just want to validate the test set w/ labels as a validation set, you can do this:
tfms = []
path = Path('data').resolve()
data = (ImageList.from_folder(path)
        .split_by_pct()
        .label_from_folder()
        .transform(tfms)
        .databunch()
        .normalize() )
learn = cnn_learner(data, models.resnet50, metrics=accuracy)
learn.fit_one_cycle(5,1e-2)

# now replace the validation dataset entry with the test dataset as a new validation dataset:
# everything is exactly the same, except replacing `split_by_pct` w/ `split_by_folder`
# (or perhaps you were already using the latter, so simply switch to valid='test')
data_test = (ImageList.from_folder(path)
        .split_by_folder(train='train', valid='test')
        .label_from_folder()
        .transform(tfms)
        .databunch()
        .normalize()
       )
learn.validate(data_test.valid_dl)
Of course, your data block can be totally different, this is just an example.
This last step is usually pretty straightforward. You just have to include all the arguments we pass to DataBunch.create (bs, num_workers, collate_fn). The class called to create a DataBunch is set in the _bunch attribute of the inputs of the training set if you need to modify it. Normally, the various subclasses we showed before handle that for you.
Inner classes
Optionally apply tfms to y if tfm_y is True.
Behind the scenes, it takes inputs ItemList and labels ItemList as its properties x and y, sets property item to None, and uses LabelList.transform to apply a list of transforms TfmList to x and y if tfm_y is set True.
from fastai.vision import *
path_data = untar_data(URLs.MNIST_TINY)
ll = ImageList.from_folder(path_data).split_by_folder('train', 'valid').label_from_folder()
ll.train.x, ll.train.y
LabelList(x=ll.train.x, y=ll.train.y)
Behind the scenes, LabelList.process does 3 three things: 1. ask labels y to be processed by yp with y.process(yp); 2. if y.filter_missing_y is True, then removes the missing data samples from x and y; 3. ask inputs x to be processed by xp with x.process(xp)
from fastai.vision import *
path_data = untar_data(URLs.MNIST_TINY)
sd = ImageList.from_folder(path_data).split_by_folder('train', 'valid')
sd.train = sd.train.label_from_folder(from_item_lists=True)
sd.valid = sd.valid.label_from_folder(from_item_lists=True)
sd.__class__ = LabelLists
xp,yp = sd.get_processors()
xp,yp
sd.train.process(xp, yp)
It initializes an ItemLists object, which basically brings in the training, valiation and testing (optionally) ItemLists as its properties. It also offers helpful warning messages on situations when the training or validation ItemList is empty.
See the following example for how to create an ItemLists object.
from fastai.vision import *
path_data = untar_data(URLs.MNIST_TINY); path_data.ls()
il_train = ImageList.from_folder(path_data/'train')
il_valid = ImageList.from_folder(path_data/'valid')
il_test = ImageList.from_folder(path_data/'test')
ils = ItemLists(path=path_data, train=il_train, valid=il_valid); ils
ils.test = il_test; ils
However, we are most likely to see an ItemLists, right after a large ItemList is splitted and turned into an ItemLists by methods like ItemList.split_by_folder. Then, we will add labels to all training and validation simply using sd.label_from_folder() (sd is an ItemLists, see example below). Now, some of you may be surprised because label_from_folder is a method of ItemList not ItemLists. Well, this is a magic of fastai data_block api.
With the following example, we may understand a little better how to get labelling done by calling ItemLists.__getattr__ with ItemList.label_from_folder.
il = ImageList.from_folder(path_data); il
An ItemList or its subclass object must do a split to turn itself into an ItemLists before doing labeling to become a LabelLists object.
sd = il.split_by_folder(train='train', valid='valid'); sd
ll = sd.label_from_folder(); ll
il_train = ImageList.from_folder(path_data/'train')
sd_train = il_train.split_none(); sd_train
ll_valid_empty = sd_train.label_from_folder(); ll_valid_empty
Behind the scenes, ItemLists.label_from_folder() actually calls ItemLists.__getattr__('label_from_folder'), in which all training, validation even testing ItemList get to call label_from_folder, and then turns the ItemLists into a LabelLists and calls LabelLists.process at last.
You can directly use LabelLists.__getattr__ to do labelling as below.
ld_inner = sd.__getattr__('label_from_folder'); ld_inner()
Creating a LabelLists object is exactly the same way as creating an ItemLists object, because its base class is ItemLists and does not overwrite ItemLists.__init__. The example below shows how to build a LabelLists object.
from fastai.vision import *
path_data = untar_data(URLs.MNIST_TINY); path_data.ls()
il_train = ImageList.from_folder(path_data/'train')
il_valid = ImageList.from_folder(path_data/'valid')
ll_test = LabelLists(path_data, il_train, il_valid);
ll_test.test = il_valid = ImageList.from_folder(path_data/'test')
ll_test
Behind the scenes, LabelLists.get_processors() first puts train.x._processor classes and train.y._processor classes into separate lists, and then instantiates those processors and puts them into xp and yp.
from fastai.vision import *
path_data = untar_data(URLs.MNIST_TINY)
sd = ImageList.from_folder(path_data).split_by_folder('train', 'valid')
sd.train = sd.train.label_from_folder(from_item_lists=True)
sd.valid = sd.valid.label_from_folder(from_item_lists=True)
sd.__class__ = LabelLists
xp,yp = sd.get_processors()
xp,yp
show_doc(ItemList.process)
processor is one or more PreProcessors objects
Behind the scenes, we put all of processor into a list and apply them all to an object of ItemList or its subclasses.
Helper functions
To be more precise, this function returns a list of FilePath objects using files in path that must have a suffix in extensions, and hidden folders and files are ignored. If recurse=True, all files in subfolders will be applied; include is used to select particular folders to apply.
Inside get_files, there is _get_files which turns all filenames inside f from directory parent/p into a list of FilePath objects. All filenames must have a suffix in extensions. All hidden files are ignored.
path_data = untar_data(URLs.MNIST_TINY)
path_data.ls()
With recurse=False, no subfolder files are made available.
list_FilePath_noRecurse = get_files(path_data)
list_FilePath_noRecurse
With recurse=True, all subfolder files are made available, except hidden files.
list_FilePath_recurse = get_files(path_data, recurse=True)
list_FilePath_recurse[:3]
list_FilePath_recurse[-2:]
With extensions=['.csv'], only files with the suffix of .csv are made available.
list_FilePath_recurse_csv = get_files(path_data, recurse=True, extensions=['.csv'])
list_FilePath_recurse_csv
With include=['test'], only files in path_data and its subfolder test are made available.
list_FilePath_include = get_files(path_data, recurse=True, extensions=['.png','.jpg','.jpeg'],
                                  include=['test'])
list_FilePath_include[:3]
list_FilePath_include[-3:]