Image Cleaner Widget
fastai offers several widgets to support the workflow of a deep learning practitioner. The purpose of the widgets are to help you organize, clean, and prepare your data for your model. Widgets are separated by data type.
path = untar_data(URLs.MNIST_SAMPLE)
data = ImageDataBunch.from_folder(path)
learn = cnn_learner(data, models.resnet18, metrics=error_rate)
learn.fit_one_cycle(2)
learn.save('stage-1')
We create a databunch with all the data in the training set and no validation set (DatasetFormatter uses only the training set)
db = (ImageList.from_folder(path)
                   .split_none()
                   .label_from_folder()
                   .databunch())
learn = cnn_learner(db, models.resnet18, metrics=[accuracy])
learn.load('stage-1');
The DatasetFormatter class prepares your image dataset for widgets by returning a formatted DatasetTfm based on the DatasetType specified. Use from_toplosses to grab the most problematic images directly from your learner. Optionally, you can restrict the formatted dataset returned to n_imgs.
ImageCleaner is for cleaning up images that don't belong in your dataset. It renders images in a row and gives you the opportunity to delete the file from your file system. To use ImageCleaner we must first use DatasetFormatter().from_toplosses to get the suggested indices for misclassified images.
ds, idxs = DatasetFormatter().from_toplosses(learn)
ImageCleaner(ds, idxs, path)
ImageCleaner does not change anything on disk (neither labels or existence of images). Instead, it creates a 'cleaned.csv' file in your data path from which you need to load your new databunch for the files to changes to be applied.
df = pd.read_csv(path/'cleaned.csv', header='infer')
# We create a databunch from our csv. We include the data in the training set and we don't use a validation set (DatasetFormatter uses only the training set)
np.random.seed(42)
db = (ImageList.from_df(df, path)
                   .split_none()
                   .label_from_df()
                   .databunch(bs=64))
learn = cnn_learner(db, models.resnet18, metrics=error_rate)
learn = learn.load('stage-1')
You can then use ImageCleaner again to find duplicates in the dataset. To do this, you can specify duplicates=True while calling ImageCleaner after getting the indices and dataset from .from_similars. Note that if you are using a layer's output which has dimensions (n_batches, n_features, 1, 1) then you don't need any pooling (this is the case with the last layer). The suggested use of .from_similars() with resnets is using the last layer and no pooling, like in the following cell.
ds, idxs = DatasetFormatter().from_similars(learn, layer_ls=[0,7,1], pool=None)
ImageCleaner(ds, idxs, path, duplicates=True)
In competitions, you need to provide predictions for the test set, for which true labels are unknown. You can slightly improve your score by manually correcting the most egregious misclassifications. Test set in competitions is usually large and cannot be inspected manually in its entirety. A good subset to look at is the images the model is the least sure about, i.e. the difference in probabilities between the most probable and the second most probable classes is minimal.
Let's start by creating an artificial test set and training a model:
db_test = ImageDataBunch.from_folder(path/'train', valid_pct = 0.2, test = '../valid')
learn = cnn_learner(db_test, models.resnet18, metrics=[accuracy])
learn.fit_one_cycle(2)
Now we can take a look at the most unsure images:
most_unsure = DatasetFormatter.from_most_unsure(learn)
wgt = PredictionsCorrector(*most_unsure)
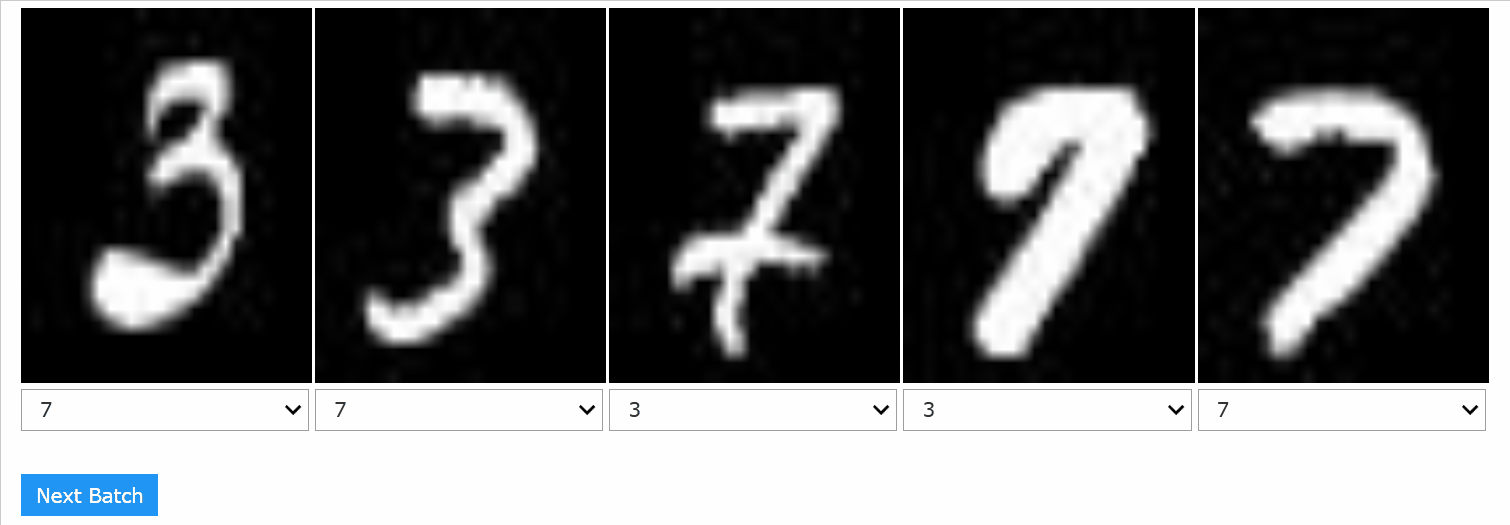
When you finished interacting with a widget, you can take a look at the corrections that were made. show_corrections displays image's index in the test set, previous label and the new label.
wgt.show_corrections(ncols=6, figsize=(9, 7))

show_doc(ImageDownloader)
ImageDownloader widget gives you a way to quickly bootstrap your image dataset without leaving the notebook. It searches and downloads images that match the search criteria and resolution / quality requirements and stores them on your filesystem within the provided path.
Images for each search query (or label) are stored in a separate folder within path. For example, if you pupulate tiger with a path setup to ./data, you'll get a folder ./data/tiger/ with the tiger images in it.
ImageDownloader will automatically clean up and verify the downloaded images with verify_images() after downloading them.
path = Config.data_path()/'image_downloader'
os.makedirs(path, exist_ok=True)
ImageDownloader(path)
Downloading images in python scripts outside Jupyter notebooks
path = Config.data_path()/'image_downloader'
files = download_google_images(path, 'aussie shepherd', size='>1024*768', n_images=30)

len(files)
After populating images with ImageDownloader, you can get a an ImageDataBunch by calling ImageDataBunch.from_folder(path, size=size), or using the data block API.
# Setup path and labels to search for
path = Config.data_path()/'image_downloader'
labels = ['boston terrier', 'french bulldog']

# Download images
for label in labels:
    download_google_images(path, label, size='>400*300', n_images=50)

# Build a databunch and train!
src = (ImageList.from_folder(path)
       .split_by_rand_pct()
       .label_from_folder()
       .transform(get_transforms(), size=224))

db  = src.databunch(bs=16, num_workers=0)

learn = cnn_learner(db, models.resnet34, metrics=[accuracy])
learn.fit_one_cycle(3)
Downloading more than a hundred images
To fetch more than a hundred images, ImageDownloader uses selenium and chromedriver to scroll through the Google Images search results page and scrape image URLs. They're not required as dependencies by default. If you don't have them installed on your system, the widget will show you an error message.
To install selenium, just pip install selenium in your fastai environment.
On a mac, you can install chromedriver with brew cask install chromedriver.
On Ubuntu Take a look at the latest Chromedriver version available, then something like:
wget https://chromedriver.storage.googleapis.com/2.45/chromedriver_linux64.zip
unzip chromedriver_linux64.zip
Note that downloading under 100 images doesn't require any dependencies other than fastai itself, however downloading more than a hundred images uses selenium and chromedriver.
size can be one of:
'>400*300'
'>640*480'
'>800*600'
'>1024*768'
'>2MP'
'>4MP'
'>6MP'
'>8MP'
'>10MP'
'>12MP'
'>15MP'
'>20MP'
'>40MP'
'>70MP'